✔ Competitive Pricing ✔ Quality Service ✔ Extensive Stock ✔ Experienced Staff


 01726 828 388


![]() For Finding eXcellent Tools ..... look no further than Westcountry Machinery 4 Wood
For Finding eXcellent Tools ..... look no further than Westcountry Machinery 4 Wood ![]()
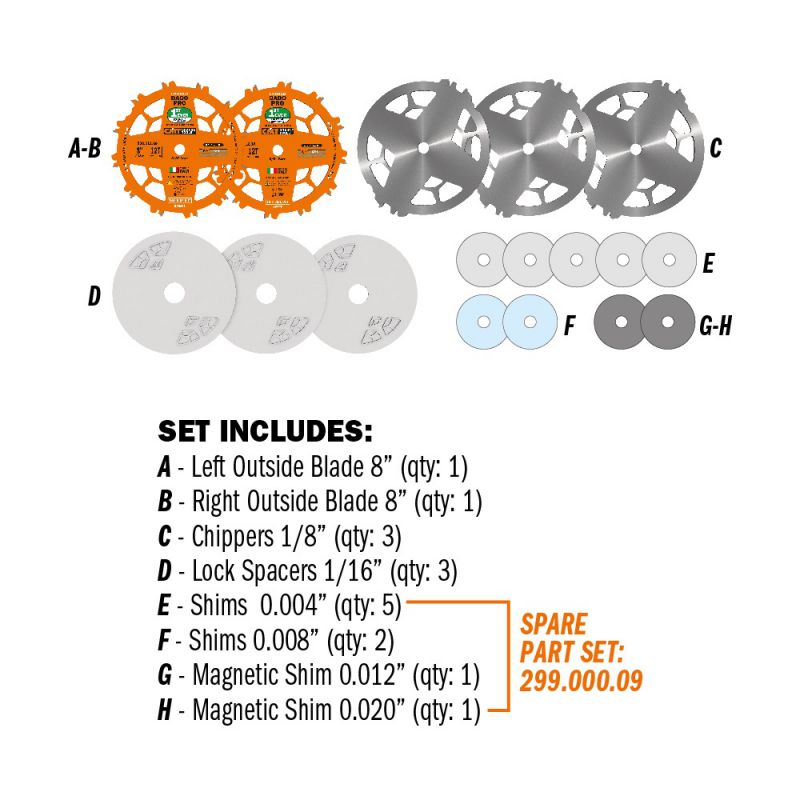
CMT Locked Dado Pro Saw Blade Set 8" D=203 B=15.88 Z12 FTG+ATB PTFE
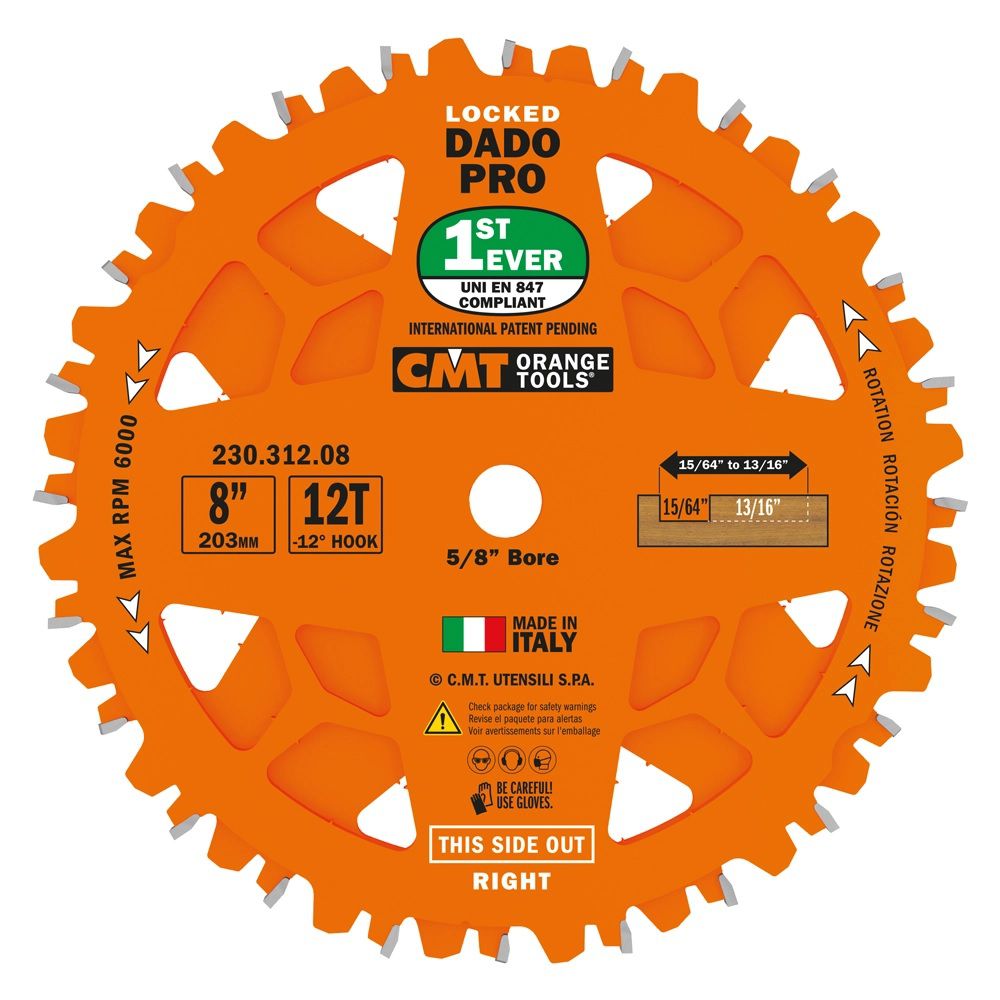

CMT Locked Dado Pro Saw Blade Set HW D=203 B=15.88 Z12 FTG+ATB PTFE
ref: 230.312.08
- CMT is proud to introduce a brand new LOCKED DADO PRO Set unlike any other!
- This is the very first Dado ever deemed UNI EN847 COMPLIANT.
- This means that while the Dado is rotating, the assembled elements will never come into contact with each other!
- This is possible thanks to unique blade body design and ‘never before seen’ special “lock spacers”.
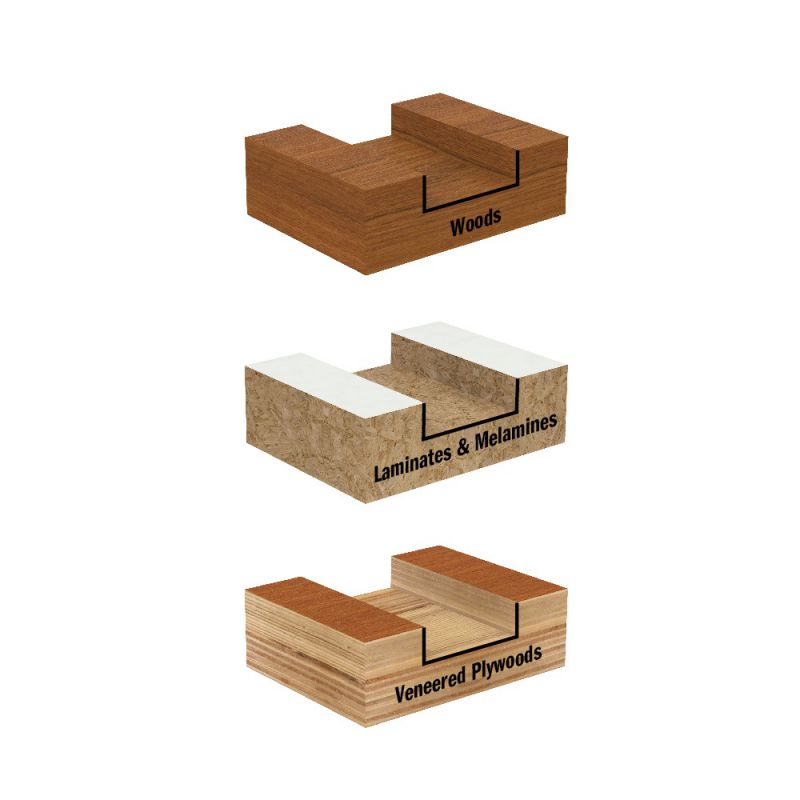
- For flat bottom grooves & virtually splinter-free cuts in solid wood, laminates & melamines, veneer plywood.
- ORANGE SHIELD COATING protect from heat, gumming and corrosion.
- Includes shims (plastic & magnetic) and plastic ‘‘lock spacers’’ set for micro-thin adjustability.
- Please note: Always use both outside blades. Never use the chippers by themselves, or with only one outside blade. Securely fasten CMT Dado on machine using manufacturers recommended dado arbor nut.
- Diameter: 203mm
- Bore: 15.88mm
- Cutting edges: 12
- Hook angle: -12° Neg
- Type of grind: FTG+ATB
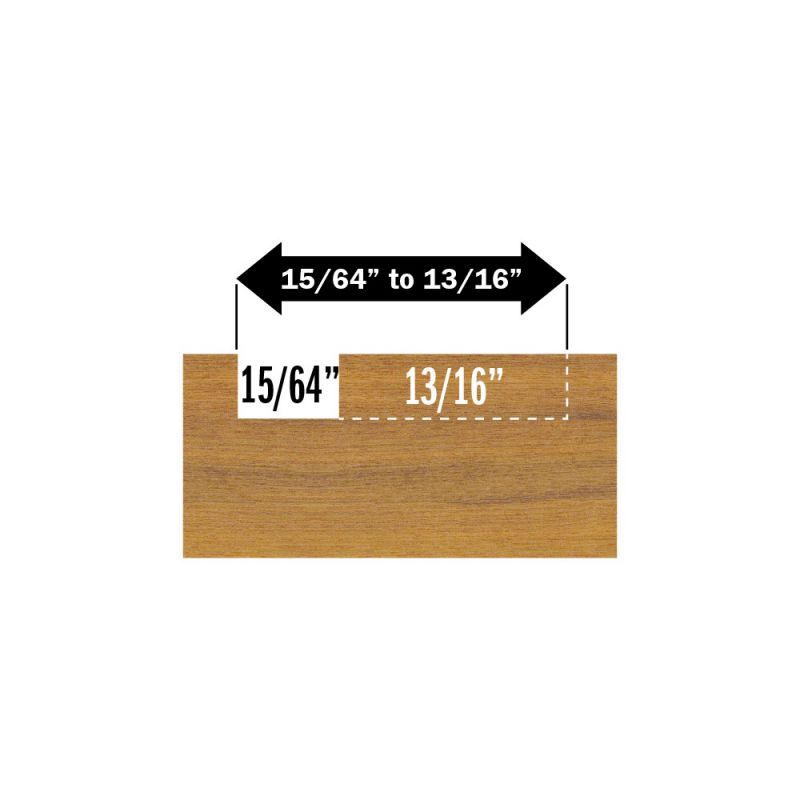
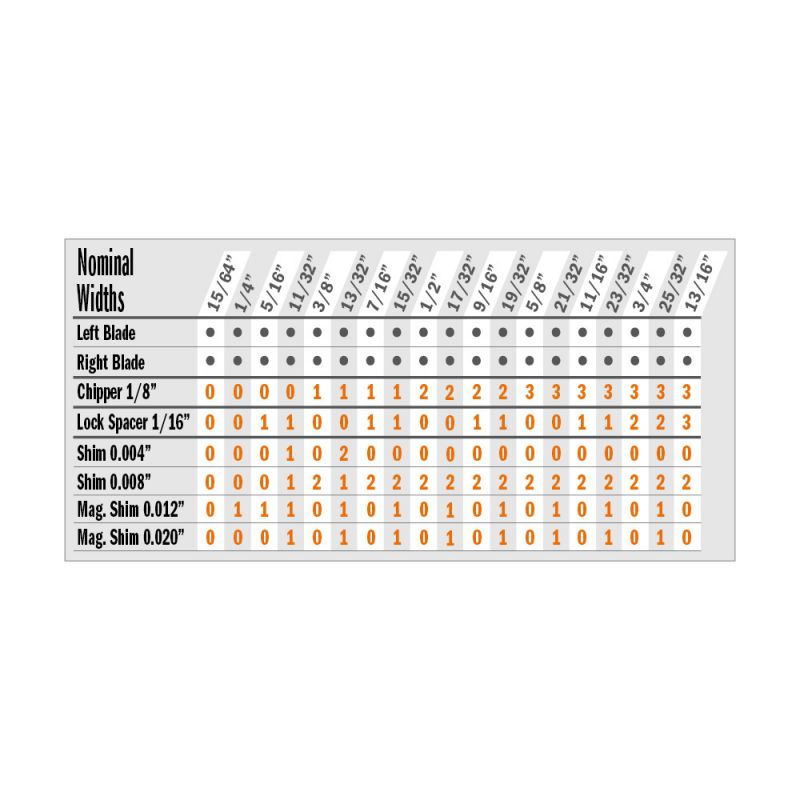
- Adjustment Range : 5.95mm (15/64") to 20.6mm (13/16")
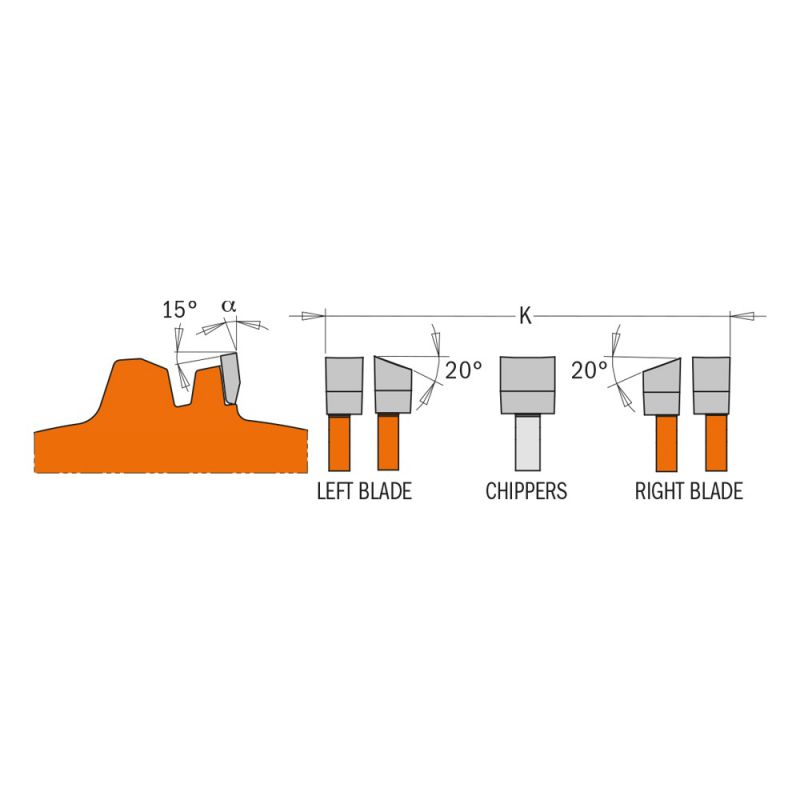
- Left Outside Blade 8” (qty: 1)
- Right Outside Blade 8” (qty: 1)
- Chippers 1/8” (qty: 3)
- Lock Spacers 1/16” (qty: 3)
- Shims 0.004” (qty: 5)
- Shims 0.008” (qty: 2)
- Magnetic Shim 0.012” (qty: 1)
- Magnetic Shim 0.020” (qty: 1)
- Radial arm saws
- Stationary table saws
CAUTION - SAFETY WARNINGS
- Carefully read all important safety instructions in the owner's manual that come with your machine before operating. If you do not have a manual, contact the manufacturer and obtain one before using this Dado.
- Always handle Dado blades with gloves. Always wear eye, dust and hearing protection. Avoid wearing loose clothing that may catch in a rotating blade.
- Unplug the machine when mounting or adjusting the Dado.
- ALWAYS USE PROTECTION AND SAFETY DEVICES OF THE SAW MACHINE WHEN OPERATING.
- Carefully check Dado prior to use. Do not use Dado if damage or defect is suspected (such as broken or missing teeth, etc.).
- Do not exceed maximum RPM recommended for the Dado.
- Do not use this Dado on metals, for masonry cutting or other materials not intended for use with this product, unless otherwise specified.
- Be sure to mount and secure Dado carefully and in the correct rotation direction as indicated on the face of the blade itself.
- ALWAYS USE BOTH OUTSIDE BLADES. NEVER USE CHIPPERS BY THEMSELVES OR WITH ONLY ONE OUTSIDE BLADE.
- Ensure to use the appropriate blade height when operating (approximately half of the length of the cutting tooth). Clamp material firmly while cutting.
- Store Dado properly to avoid damage and rusting. Failure to heed all safety instructions and warnings regarding use of this product can result in serious bodily injury.
1-SETUP
-
a. Before installing/adjusting Dado blade, make sure to disconnect your machine from all power sources by pulling out plug. Refer to chart on reverse side to select the desired groove width. Be sure all machine and cutting components are clean and free of dust/chips. Failure to clean cutting components will impact cutting performance and result in damage.
-
b. Install the first outside Dado blade on the arbor of the saw machine. Teeth of the blades/chippers must point in the direction of blade rotation. The sides of the Dado blades marked “THIS SIDE OUT” must always FACE OUT.
-
c. Based on the desired groove width, there will be different ways of setting up the outside blades/spacers/chippers (the 4 most important settings can be found on the back of the Dado packaging).
-
SETTING 1: When only the two outside blades are in use, the blades should fit together (Fig. 1) according to the seat located behind every tooth of the Dado blade (Fig. 2).
-
SETTING 2: When the desired groove dimension requires one or more lock spacers (white plastic disk), it is important that the raised protrusions, or “lock keys” featured on the discs (Fig. 3), fit snuggly into the slots of the Dado blade (Fig. 4). The slots of the Dado blades also feature very small holding spikes (Fig. 5), which will bite into lock spacer, locking it into place. The orientation of the lock keys (raised protrusions) are such that you cannot incorrectly set up the outside blades or chippers (the lock spacers are the same and are not directional).
-
SETTING 3: When you need to set up two outside blades and one or more chippers, all elements should be set up as per Fig. 6, following the instructions above (Setting 1). Teeth that share the same sharpening type should preferably be set up close together, as shown in Fig. 7-8.
-
SETTING 4: If the desired width requires the use of outside blades/spacers/chippers, the set up will follow that which is described above (Fig. 9). The slots on the outside blades and chippers will also help in disassembly (Fig. 10).
-
MICRO-THIN ADJUSTMENT: If one or more spacers are used to carry out micro-thin adjustment, they may be inserted between each pair of outside blades/chipper/spacers. The presence of magnetic spacers will simplify Dado set up. NOTE: No matter how the Dado is set up, it will always be UNI EN 847 compliant. This means while in rotation, the assembled elements will never come into contact with each other.
-
d. Once the outside blade has been set up correctly (The side of the Dado blade marked “THIS SIDE OUT” must always FACE OUT), squeeze the assembled elements together to determine whether all the parts, as well as the outside blades, are correctly locked together. Perform a final check and inspect the proper set up of all the elements. SECURELY FASTEN CMT DADO ON MACHINE USING MANUFACTURER’S RECOMMENDED DADO ARBOR NUT. Install correct table insert and safety guards as per your saw machine’s instruction manual. Once all components have been installed and fastened, check that Dado set rotates freely without any interference. You are now ready to plug in your saw machine.
2-ADJUST FIT
-
Carry out a test cut in a scrap piece of wood.
-
a. If it is too tight: disconnect saw machine from power source, remove fasteners and outside blade, install appropriate shims/spacers/chippers according to your desired fit. Then, reinstall outside blade and fasteners. Carry out another test cut.
-
b. If it is too loose: disconnect saw machine from power source, remove fasteners and outside blade, remove either shims/spacers/chippers according to your desired fit. Then, reinstall outside blade and fasteners. Carry out another test cut. Repeat this process until you reach desired fit.
3-OPERATION
-
For better control and safety, make multiple passes with a reduced cut depth. Wide Dado cuts at full depth remove significant amounts of material in a single pass. DO NOT carry out freehand cuts or bevel Dado cuts. Always position/guide your work using a rip fence or a miter gauge. Wherever possible, use feather boards, push sticks or other jigs to secure the workpiece.
Download full instructions and images here